HomeAboutFreebies

Tuesday, August 13, 2013

Classroom Digs

Day 2 of "Teacher Week" over at Blog Hoppin' is Classroom Digs.
 I am loving how my room is turning out, so I can't resist sharing some pictures.

It is no secret that I have been working in my classroom all summer. I've read that many of you have done the same. I have to admit I am really happy with how my room has turned out. Because of this I will let my pictures do most of the talking. Especially since this is my first day of school and I don't have much energy or time to spare.
This year, I am continuing my Surfing theme. I love that it is bright and fun. I merge it with lots of chevron and some stripes, even some polkadots. Take a peek.
Before you come in though, check out my Toucan You Can Hallway Writing. Whatever weekly letter we are working on will go here and the kids will silently finger trace it before they enter the room.
This is easily one of may favorite spots in my room this year. This awesome line up spot comes from Michelle, Fabulous In First's, Facebook page.
This year's voice volumes shall be decided by Mr. Crab.
Here is my calendar wall, and carpet meeting place.
This year I decided I wanted something on the little wall space between windows, but I wasn't sure what, until I saw my birthday cupcakes. They were a perfect fit.
If you looked left, when you walked in, you'd see my orange, yes orange, wall & cabinets. I don't have everything up. Somethings, like my color and number posters only go up after I have taught them. However, I love my book boxes.
I don't have a "desk" but 2 tables arranged in an L. One is for all of my stuff and the other, the one you see upfront, I use for my small group instruction. I have a Monday Made It post for these Write and Wipe spots scheduled for next Monday.
These are the student tables. Loving Kristen's, from Ladybug Teacher Files, table numbers.
Speaking of Kristen, here is her beautiful alphabet line framed by some CTP chevron borders. Those borders add a perfect punch of color when putting up items on the bare wall.
And I used it again for my blends, vowel pairs and digraphs.
You also get a good look at my Word Wall. Yep I did a triple border. Love the way it turned out.
These next two boards are for Reading and Writing.
Not much on them yet, but we will add as we go along.
Love these little rules posters. They came from Cara Carroll's shop.
This is the easiest way to display the date EVER. I got the month headers and numbers from Maria from, Kinder Craze. I punched holes and added rings in them. Now all I do is flip it over each day. Saves me so much time, and if I forget the kids will remind me.
Can't leave out my OTHER alphabet. This one is the one I use with my Kinder kids, (also from Cara Carroll. To be honest I have all of her chevron stuff, think I have a problem.) RememberI see multiple grade levels of ELL/ ESL kids. I didn't want anything behind the posters, so again I framed it with the chevron borders. If you are wondering why I left space below, it is because I add the alphabet friend for the letter we are learning, as we learn the letter, weekly.
Check out my door and my Surf Shack banner. THe pocket charts are for my line order. Each students picture will be posted with a number next to it so there know what spot they are to stand in line.
Before you go, please read our weekly Palm Tree Password.

Last year I took some panorama shots with my iPhone and I love it so here it is again.
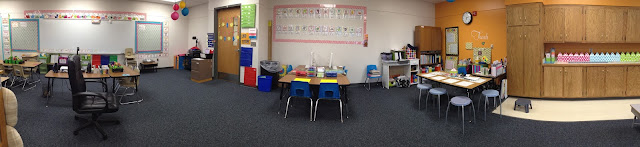
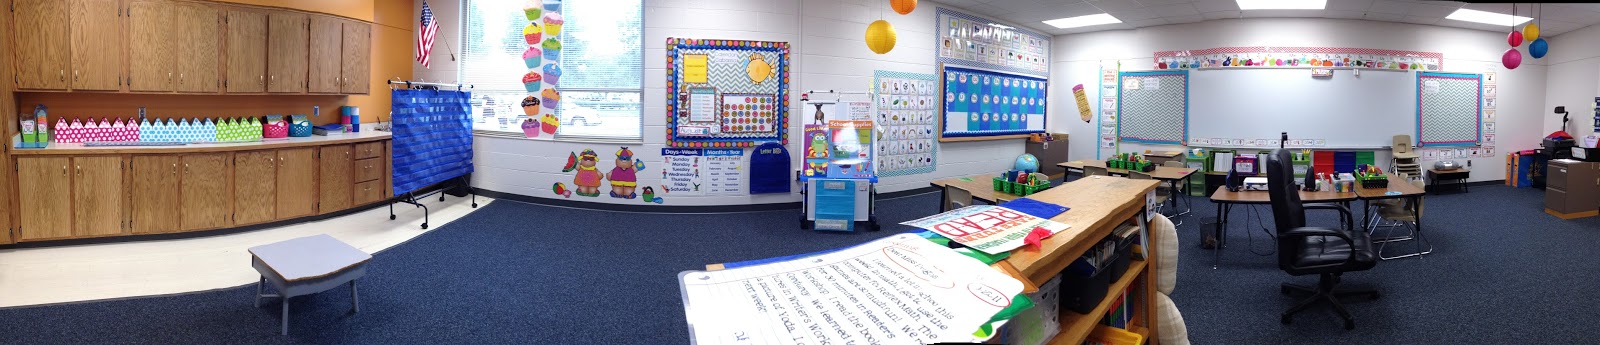


That is pretty much it. Lots of stuff up, and tons of details still missing, but we will get there eventually. Hope you enjoyed a little peek into my room. Don't forget to hop on over and check out everyone elses rooms too.
Oh and I am going to take advantage and also link up yo Corrina's Class Theme Linky.

Saturday, August 10, 2013

Five for Friday... on Saturday 08/10/13

Hi everyone,
Wow, what a busy week. My first official week back is done. Next week the kids start. Yikes, I guess better get started on those plans.  But before I do I will join in on Doodle Bugs Five for Friday linky.

1. Chevron Boarders
I posted a similar pic of my Chevron alphabet, from Cara Caroll, and matching chevron border from CTP, but I added my Tiki Man and just had to put up a new pic. I love it so much. 

2. Whiteboard Spots
This was todays big project. Oh boy was this a labor of love. Yes, those are triple borders. Again I used the chevron, from CTP, on the blank wall just to dress up and frame my chevron blends & digraphs. These came from Latoya Reed.

3. Table Numbers
Finally, after 2 years, I got the hang of my circle cutter. So I now have some perfectly round bright table numbers. Aren't they cute? They came from the fab Kristen, over at Ladybug Teacher Files

4. Cutie Numbers
Aren't these adorable? They are Sara Cooley's creation. Can't wait to get her alphabet too. I think I will put these up next to my chevron numbers from Cara Carroll.

5. Lin Up Here
This one was a huge hit at work. I have to agree, I love it, and is one of my fave new things in my room. Everyone that came by wanted one. Finally had to send them all Michelle's way. If you want one, head on over to Fabulous In First's Facebook page. It is a fan freebie.

6. Table Runner
And that is what I do when I look back at my desk, smile. I had some extra fabric so I had a fellow teacher make me a runner out of it. This wayI can kind of protect my whiteboard spots. Post on those coming soon for Monday Made it. :)

To quote an old friend of mine, Porky the Pig... "That's all folks!" Hope your having a great weekend and don't forget to check out all the other fab bloggers posts on Doodle Bugs 

Thursday, August 8, 2013

Throwback Thursday 08/08/13: Beg, Mid, End


Happy Thursday!
I couldn't pass up the chance to link up with the fabulous Cara from The First Grade Parade for a super fun linky party...
Throwback Thursday: an ode to old blog posts. :)


In my district we teach writing with the 6 traits. My kinder kids just got done with Organization. I know I have previously mentioned that we use the "O Train" to help us teach this skill. 
The O Train really helps my, very visual, ELL students. They can easily see that the train has 3 parts, just like their stories. This is how I introduce it to my student...
The first, or beginning, train is the engine, and it is green, for go! That is the start of our stories and helps to lead, like a line leader. The second car is the middle, the most interesting and exciting part. This cart is yellow, and helps us to slow down. The last car is the end and is red. This means stop and the end of our stories.
For my ELL kids I also transferred these images to their writing paper, without the color of course. Here is a freebie for you. Again, this is what my Kinder Kids use, not my 1st graders.3 pg bk 3 lines a


As you can see, I have added the train parts to each page to help my students remember what part they are working on. This also helps them to not start a new stories on each page. They are to stretch their stories out to have a beginning, middle and end. I also added 1st, 2nd and 3rd to the trains.

Before my students begin to write they have to plan their stories. I have a couple planning pages that go with the writing paper but I find that if you have enough time for them to complete a story it is best to have the students touch each page and say what they will draw and write on the lines. However, because I don't have a lot of writing time with my ELL students I do use the planning pages. Just click on the image below.
The students are only supposed to sketch their story in 3 parts quickly. The reason for this sheet is for students to remember what is supposed to come next and last.  When completed my students staple this page to their book and can transfer their illustrations and story.

Once all that is taught and becomes routine I teach leads and transition words. Sounds like a lot for a Kindergartner? It may be but some kids get it, and others will at least have been exposed to it and will have some sort of foundation when they get older. 

I teach leads as "Story Starters". They "lead" the story, like our engine and line leader. We talk about good ways to start a story and how it is pretty boring to always start with "I". "We", I, brainstorm possible ways to start our stories, out loud and create a list. I type the leads on my laptop and have my kids watch. This way I have a clean poster that the students recognize. The story starters are mounted on green construction paper to match the train's engine.
In a few days time I introduce transition words. No surprise they are also color coordinated to match their cars.
I realized once I had them up I should have added the trains to them too. Oh well, they color will have to be enough.
Finally, (like my transition word?) I also print these on colored paper and place on the board for easy referencing.
Most kids won't use transition words. Only the really quick kids will pick up on it. However, I find that having them up and referencing them when I model writing really helps my students understand what I am talking about. They start to use them when they are talking, which is a fantastic side effect for me as an ELL teacher.

Another way we practice telling our stories in 3 parts is with 3 hula hoops or 3 squares (made with masking tape) on the floor. The kids step in a hula hoop or square and tell the beginning, middle and then the end. The hula hoops are nice because they can be removed and put away. However, the squares are nice too because they can be used for other activities like retelling stories, blending and segmenting, sorting items or even math equations.

So one more freebie for you... the transition posters. Just click on the links below to get a copy for your room.

All this takes a couple months to get through and I probably spend a whole quarter on it. I also use the beg, mid and end strategies to help us retell the stories we have read. I love it when my students start to recognize and pick out the leads and transition words in the reading text. They get so excited. It is a great way to help them understand this is not just a writing skill but a life skill.

One last thing. In School B they created a different planning page and 3 page book, with transition words already on the page. This all comes stapled together already and is less work for the students. Of course I added some trains. If you are interested you can click on the image below to get your own copy.

Wow, lots of freebies! I hope you find some of them helpful. If you download and use these, please leave a comment. I'd love to hear what you think, how you use them or if you do something differently. 

*****************************************************
FYI: I have gotten lots of comments on the Scribed account. Here is a little info about it. It is free, but if it should ask you to pay before you download a doc, don't. If you upload any of your docs, it allows you to continue to download for free. 

I'm sorry, for any inconvenience. I originally switched to Scribed cause google docs was acting wonky for me. That was years ago and now I Am back on Google docs, BUT don't really have the time to upload everything again. Maybe one day. :) However, I do want to say that many updated versions of documents have be uploaded to my blog via Google Docs. So if you follow regularly, or go back through my posts, you can find most of these. I know that all the writing papers have been updated. Until then, feel free to enjoy these.

Be sure to join in the fun and link up with Cara.


Monday, August 5, 2013

Monday Made It: Duct Tape Stools

Holy smokes, I was so excited to share this project but after working in my room all day getting it ready for our ELL parent night I am worn out. However, I did want to share one of the project I been creating. I'm linking up with Tara's Monday Made It. Just know that this post will be more picture heavy than wordy. If you have any questions, feel free to ask and I will make sure to answer.
Started with 5 mis matched stools. I wanted new ones but I am already broke and yes I know we just got paid a few days ago but I have already blown through my back to school budget.

I wanted to cover them in some extra chevron fabric I have on my Bulletin Boards, but my fear was that since I would be hot glueing it, that it would come off easily. A friend suggested the duct tape and I went for it. 

I started in the middle, to ensure I got the most out of the pattern. I went over the edge and left a little to fold under.

 Once the top was done I wanted to clean up the sides. So I took a strip and went around the sides.

Here is a pic, once the sides were covered. I still have a little cleaning up to do around the legs, but they are pretty much done. I like how they turned out. Best part is they are cohesive. I was initially scared that the pattern would be a problem to match up, but it wasn't at all. Very forgiving.

Here is they are. 5 matching stools for my guided reading table. Please forgive the mess on the floor. Still working on this area.

I have to say that, while the project was relatively easy, by the 3rd stool I was ready to scream. The 2nd roll of tape was very tacky and kept sticking to me. I swear it ripped off skin. (Ignore me, I am very dramatic.) So here they are, 5 matching stools for my guided reading table.

Don't forget to check out all the other fabulous projects on Tara's Monday Made It. Just click the button below.

Sunday, August 4, 2013

Currently: August

It is that time again.
What time you may ask? It Currently time.

1. Listening:
I think this one needs no explanation. Now really if you haven't seen this, you have to stop and watch right now. I'll post the vid for you below. Go ahead, I will wait. It is really too much fun to pass up.

2. Loving:
After a long pause, I've been motivated with a ton of ideas. I've written them down in my notebook and once I get them completed I will be blogging bout them. 

3. Thinking:
Now I am not the least bit worried about what I will be teaching in a weeks time. I have the nagging feeling that I should be thinking about it, but I really could't be bothered. LOL I know I will do rules and procedures and then go into names with my kinder kids, but my first graders, well no clue. LOL

4. Wanting: 
I've decided I wanted to write an iPad mini for my classroom, so I wrote a DC grant for one. However, then I got cold feet and didn't submit. My fear? That it won't be funded because it is so much.

5. Needing:
Nothing tangible really, well aside from a functioning work Mac, but that is in the works. What I really need is some more vacation time. Right? I have so many ideas and I know once I go back to work, Monday, that I will have very little time and energy to make all the wonderful things I've been reading about on your blogs.

6. B2S must haves:
1. Umm, my MacBook, the one for work, is sick. The doctor is going to fix her but I am patiently waiting. I am very grateful that she will be fixed as I really depend on her a lot!
2. I don't think this needs an explanation. One of the few times a year we get to eat out with our fellow teachers, so I should go by the ATM and take out some lunch cash. I love me some french fries or mexican.
3. New binders? Well this is an addiction. I am thinking my binders are all sizes and colors and I want to make then all match. HOWEVER, I am over budget so I am NOT going to purchase unless I find a fabulous deal. I am thinking I will just overhaul the covers and make them cohesive that way.

SO that is my currently. What are you up to? Don't forget to hop on over to Farley's blog and read everyone else's posts too.

Saturday, August 3, 2013

Anchor Chart Linky

Remember way back when I had an anchor chart Linky? It was over a year ago. Now I know that you all have had way many more fabulous ideas for Anchor Charts, so I was excited when I saw that Carly, from First Grade Fabulosity, was doing a new anchor chart linky.

Here are some of the faves I have up in my room...
Reading:
These are a mixture of charts. The ones on the bulletin board comes from Lindsey's, The Teacher Wife, reading comprehension pack. While the reading genres come from Christie, The FlipFlop Teacher.

Writing:
My goal last year was to make all my bulletin boards cohesive. So you will see my writing board, while different, will match and have many similar elements to my reading.

The writing process


I used a ribbon and clothes pins and allowed my students to move them around to show what step in the writing process they were for the day.


It took a lot of practice but they loved it. It made it a lot easier to know who was stuck in one spot for too many days and needed some specific conferencing.

This board described out 6 writing traits. As the traits were introduced I moved it up to the top and added our districts anchor charts too.

So now let's see what anchor charts are your favorites. Hop on over to Carly's blog and link up too!

Friday, August 2, 2013

Five for Friday: 08-02-13

Hi everyone,

I have so much to say but have no clue where to start. So I decided to just give you snippets and join in on Doodle Bugs Five for Friday linky.

1. Chevron Boarders
One of this years new purchases are CTP's chevron boarders. Now I am not adding these to my chevron bulletin boards because that is just way too much chevron. No those get solid boarders. These are for other items I have up on my walls with out a background. I wanted to find a way to group them together or frame them and this turned out to be the perfect way. More pics to come when I finish up my room next week.

2. Whiteboard Spots
I've seen these around for 2 years now and would you know that I finally found these sheets while looking for something else entirely. I actually got these for a great price at Walmart. I put them on my small group/ guided reading table. This should save us some time, as the students will not have to run back and forth grabbing supplies. The other day Kristen blogged about her clipboard/whiteboards and I am thinking I will go back to get some more sheets and make some for my class too. 

3. Dying MacBook
This is a sad moment. Just 2 days ago my MacBook, my work machine, started to fail on me. It just wouldn't load. Now I still have my personal Mac Air, but this is still hard on me. This baby has been with me for 4 years and holds so much. Now luckily I have everything backed up on an external hard drive. The bright light at the end of the tunnel is that my fabulous Team Leader is going to save the day. Her genius husband said it looks like a bad hard drive and will save the day soon. *crossing my fingers*

4. Dr. Jean is brilliant.
I just spend two days with the marvelous Dr. Jean Feldman. I have so many ideas. I am definitely going to be blogging about some of them. 

5. Lakeshore Learning
Finally, after the conference yesterday, my team and I went to the new Lakeshore Learning store. Everything was 20% off. Well I am proud to say I walked out without spending a penny. True, I bought all my stuff already, and even though I was seriously tempted to get some new surfboards and chevron pockets, I resisted. I mean I do already have two other packs of pockets sitting in my classroom. PLUS the most important bit is I have nothing to use these for. However, I will be purchasing some next year. :P I have that long to think of what to do with them. Ha ha ha

That is it... for now. I hope to be back so and share so many other things. Don't forget to check out the party over at Doodle Bugs Five for Friday linky.