Thursday, December 30, 2010
New Years Resolutions.
One of the things I want to teach my ELL students this year is about new years resolution. The concept of a new year is difficult for my students, who are just learning about the months of the year, to grasp. So every year I have set aside some time to connect some ideas and explain to my students that they HAVE already learned what happens after December, that we go back to January and start again, with a new year. It's not that difficult but it take a minute or two.
So this year I tought I would talk about resolutions. I saw a cute idea, on several blogs, about having the students draw their faces with a party hat on and write a resolution in a speech bubble. I thought his was adorable and plan to do It with my 1st graders. (My kinder students will be learning what to wear in the snow. I will post about it later this week.)
I want to go out on the 2nd of the year and buy the 2011 party stuff on sale and celebrate the new year with my studets in Monday. I mean party hats, noise makers, streemers, anythig I can get on sale.
I have The Night Before New Years, and I'll read that to my student. We will talk about what they did to get ready for the new year & what they did the first day of the new year.
I was wondering what other activities are out there. What do you do with your class to celebrate the new year?
Snow People
There are so many snowmen activities out there it is hard to chose which ones I want to do with my students. Maybe I should say, which ones I will have time to do with my students. I never have time to cover snowmen before the holiday break so I always do them in January. However, I have this wonderful book by Caralyn Buehner called Snowmen at Christmas.
I read Snowmen at Christmas before the holiday break.
You probably have seen it before it is part of a growing seris. The original one is called Snowmen at Night.
That's the one I will read to my class the second week of January, to kick off my week of Snowpeople activities. I will probably begin making a web of everything my students know about snowmen. We will then read the story and do a beginning, middle & end story map. We will make snowpeople with our handprints, much like everyone has already done with ornaments. However, we will make them on a flat surface and frame them like a portrait. I have a cute little poem about making a snowman, that I forgot at the moment. Sorry I will post it as soon as I get back to work. So we will try to actualy make a snowperson, provided it snows. Unlike the rest of the states we haven't gotten much snow this year. Many of my students have never played in snow, much less have made a snowman so this will be a great expirience for them... I hope. I'll probably have some "out of order sentence for my kinder students to cut out, rearrange an glue. I promise to put that up once I get it done. Oh and I will have my 1st graders finish this sentence...
If I were a Snow...
(Please click on link to download sheet.) Then they will illustrate.
It seems like a lot to do along with all my regular curriculum, but I get to split it up between kinder & 1st so I SHOULD be ok. I do want to share one more thing. About a month ago my school had 1 of our 2 annual book fairs. On one if the shelves I found this...
It is VERY cute an I think I will buy it and read it in the spring. Then I can talk about the possibility of having a snowman all year round and what happens to them.
Saturday, December 25, 2010
Elf Yourself
I don't know if you've heard of Elf Yourself, but if you haven't you just have to try it. Basically you upload a picture of yourself and/ or others. You can use up to 5 pictures. Then you pick a kind of dance, Disco, Hip Hop, surfing or singing. Then you just sit back and enjoy! The best part is that it is all free.
The day before school let out I did it for my students. It was a riot, I have never heard them laugh so hard. I had a co-worker go home and show it to her family and within minutes her daughter had made one of her family.
Whether you make one for your students, your family, or just for yourself, I suggest you try it. Enjoy!
Candy Cane Patterens
This idea I also got from another blog. What a better way to review patterns than making them with Candy Canes!
I game my students a candy cane coloring sheet and had them decide if they wanted to draw an AB or ABC pattern. They colored in their candy cane and then finished the sentence, Check out my Candy Cane _____ pattern. They cut it and glued it to a sheet of green construction paper.


For my students who are still struggling with the English language, I skipped adding the AB and ABC part of the sentence and just had them trace the words, Check out my Candy Cane pattern.

Here is what they all look like together.

I game my students a candy cane coloring sheet and had them decide if they wanted to draw an AB or ABC pattern. They colored in their candy cane and then finished the sentence, Check out my Candy Cane _____ pattern. They cut it and glued it to a sheet of green construction paper.


For my students who are still struggling with the English language, I skipped adding the AB and ABC part of the sentence and just had them trace the words, Check out my Candy Cane pattern.

Here is what they all look like together.

The day after Christmas...
I was reading a wonderful blog, which I can't remember at the moment. The teacher had done a great activity where her students had written what Rudolph would do with Santa's sleigh the day after Christmas. I LOVED this idea and adapted it just a little.
My students had sang Rudolph the Red Nose Reindeer song in their Holiday sing, so they were very familiar with the character. Then we read The Wild Reindeer by Jan Brett. After we discussed the book I gave them this writing activity. The day after Christmas Rudolph and the other reindeer will... and they were to finish the story, then illustrate.
We colored and cut out a reindeer head, that I am very sorry I did not get to upload for you, and glued it all on to a sheet of red paper. Here is what they looked like.


The stories ranged from Rudolph taking a LOOOOONG nap, to all the reindeer going to the beach to have a swim. They were a great laugh.
I do have the writing sheet uploaded for you to download here.
My students had sang Rudolph the Red Nose Reindeer song in their Holiday sing, so they were very familiar with the character. Then we read The Wild Reindeer by Jan Brett. After we discussed the book I gave them this writing activity. The day after Christmas Rudolph and the other reindeer will... and they were to finish the story, then illustrate.
We colored and cut out a reindeer head, that I am very sorry I did not get to upload for you, and glued it all on to a sheet of red paper. Here is what they looked like.


The stories ranged from Rudolph taking a LOOOOONG nap, to all the reindeer going to the beach to have a swim. They were a great laugh.
I do have the writing sheet uploaded for you to download here.
How the Grinch SAVED Christmas
A few days before break, the K/1 grade team did a Holiday rotation. Each teacher took on one aspect of the Winter holidays and in 25 minutes did a lesson teaching that holiday. These were the rotations, Hanakkah, Kwanza, Las Posadas, Mala Kelikimaka, Traditional Christmas, and Secular Christmas. I teamed up with a 1stgrade teacher and took on Secular Christmas. We decided that the Grinch was the best way to tackle this topic, and still teach the students that Christmas is not all about gifts.
Our lesson began with a quick reading of the Grinch. Most of the students had already read and seen the movie, so this was more of a review for them.
Next, we had the first graders, color and cut out an ornament for our tree. Explaining that we were sharing our time with our friends and that was a gift in itself.


The Kindergarteners were in charge of making the gifts. These could be a picture of anything ranging from something they could make to spending time with someone they loved. We tried to stress not giving material gifts, but spending time with someone.


It was topped off with the quote, from the book, saying...


It turned out MUCH cuter than we imagined.


Our lesson began with a quick reading of the Grinch. Most of the students had already read and seen the movie, so this was more of a review for them.
Next, we had the first graders, color and cut out an ornament for our tree. Explaining that we were sharing our time with our friends and that was a gift in itself.


The Kindergarteners were in charge of making the gifts. These could be a picture of anything ranging from something they could make to spending time with someone they loved. We tried to stress not giving material gifts, but spending time with someone.


It was topped off with the quote, from the book, saying...


It turned out MUCH cuter than we imagined.


Wednesday, December 22, 2010
Quick, creative and very affordable gift.
Alright so I have been trolling the Internet looking for a cute, creative, affordable gift for some of my fellow teachers. Now there are LOTS of great gifts, I found tons on sistersstuff and eighteen25. However, none of them fit what I wanted to create. My criteria was cute, affordable, can be made in less than 15 minutes, and could be done with materials I already have handy. I came up with this...

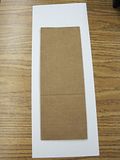
First thing I did was cut some cardboard that I had lying around. I cut it so that there was about 1/4'' inch on either side of a standard size post it note pad and long enough for two post it pads.
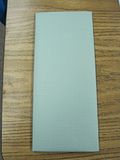
Next, I picked a sheet of scrapbook/ decorative paper, and cut it so that I had about 1/2'' inch extra on all 4 sides. This way I could wrap it around the back. Then I wrapped the cardboard. Don't worry if it doesn't cover the whole back. I cut another piece of the same paper. Make sure it is the size of the cardboard. This piece will be glued to the back to give it a clean look.
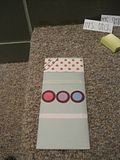
This next part is the decorative part. I cut a piece of different paper for a header, and glued it to the top. Sorry I don't have measurements. I just kind of eyeballed it. After I got all the paper glued down, I laid out the ribbon, decorative and post it notes to measure where I wanted everything to be. I played around with the layout until I was satisfied, then glued everything down. About half way down, I glued some Dots on Chocolate mini designer cut outs, I got from Creative Teaching press. I wrapped the ribbon around and I glued them down with some Glue Dots, I LOVE them. Here is what it looks like.
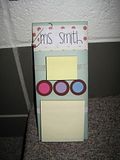
Next I printed the recipients name and printed on plane white paper cut it out to size and attached it with a paper clip. Then I slipped the last sheet of the note pad through the ribbon and I was done! See the final product below.


First thing I did was cut some cardboard that I had lying around. I cut it so that there was about 1/4'' inch on either side of a standard size post it note pad and long enough for two post it pads.

Next, I picked a sheet of scrapbook/ decorative paper, and cut it so that I had about 1/2'' inch extra on all 4 sides. This way I could wrap it around the back. Then I wrapped the cardboard. Don't worry if it doesn't cover the whole back. I cut another piece of the same paper. Make sure it is the size of the cardboard. This piece will be glued to the back to give it a clean look.

This next part is the decorative part. I cut a piece of different paper for a header, and glued it to the top. Sorry I don't have measurements. I just kind of eyeballed it. After I got all the paper glued down, I laid out the ribbon, decorative and post it notes to measure where I wanted everything to be. I played around with the layout until I was satisfied, then glued everything down. About half way down, I glued some Dots on Chocolate mini designer cut outs, I got from Creative Teaching press. I wrapped the ribbon around and I glued them down with some Glue Dots, I LOVE them. Here is what it looks like.

Next I printed the recipients name and printed on plane white paper cut it out to size and attached it with a paper clip. Then I slipped the last sheet of the note pad through the ribbon and I was done! See the final product below.

Wednesday, December 15, 2010
The Grinch That Stole Christmas- Beginning, Middle & End
This week we have been reading all about How The Grinch Stole Christmas. I have to take a minute to thank Ms. H, for giving us our very own Grinch to have with us in our class! It is one of my FAVORITE Christmas stories, so I have been reading it with ALL my classes. I decided that I would work on a beginning, middle and end story tree with my Kindergartners.
On Monday we learned Deanna's wonderful Mr. Grinch song, from her mini Grinch unit. Which the kids loved because they already knew the Jingle Bells tune. We discussed some vocabulary words like mean, scowling, grew and heart.
On Tuesday, we read the book, while looking for one of our vocabulary words of the week, "go". We found it! Then we talked about what made the Grinch's heart grow.
Today, Wednesday, we made a beginning, middle & end story tree. I had seen several Kindergarten blogs out there that do them. They look wonderful and I thought it would be a piece of cake. Boy was I wrong. I started with a big sheet of bulletin board paper. I printed up the title and labels for the beginning, middle & end. Next, I had my students come up with sentences, that I then wrote and had them copy. Big mistake # 1, they had a very difficult time with this. Then we had to decide if that sentence went in the beginning, middle or end of our tree, big mistake #2. We did not get to finish as a group. I had to finish it up during my plan.
You see what I wanted to measure/ show, was if my students could identify the beginning, middle & end of a story. However, my students were hung up on their handwriting and too WAY too long to write up their sentence strips. Therefore I did not get to assess what I really wanted to assess. I should have known better but I was too caught up in the activity to realize the big road block in my way.
Fortunately, I have two Kindergarten classes, so I had a chance to make up for my mistakes. During my plan I rethought through my lesson. For my next group, I printed up some sentences, almost directly from the story book. The students had to trace the words, after I read them aloud. Next, we concentrated on if our sentence was a part of the story that went at the beginning, middle, or end of our story. Them we glued them on to our tree. This lesson went much smoother. For sentences click here.
Tomorrow, we are going to make a Grinch mask and act out what the Grinch was like at the start of the story and, the end of the story. Then draw about it. I got the mask from www.seussville.com. However, I have it uploaded to Google Docs and you can get it here.
Finally, on Friday, we will conclude our Grinch study by watching the movie!
Monday, December 13, 2010
Holiday Garland
A few posts ago I posted about a holiday wreath. In addition to the wreaths I had my students also make a holiday garland. Pretty easy to make.
You'll need string, student pictures, a round template (I used a paper ornament) and colored / scrapbook paper.
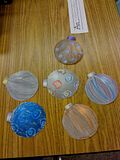
First, you have the students color & cut your circles/ornaments.
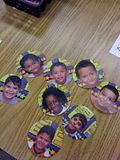
Second, you'll need to cut you your students pictures in a circle. Make sure your students pictures are smaller than your ornaments.
Next, get some cute paper. You'll want two different colors/ kinds. You can Write messages or just add some cute clipart. Then cut those into circles also. Glue your students pictures to the students ornaments. Then glue your messages & clipart to your colored paper. Punch 2 holes at the top of each circle/ ornaments. Sorry I don't have a picture of this.
Last, string your ornaments/ circles on your string and tie a knot at each end.
Here are 2 examples.
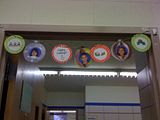
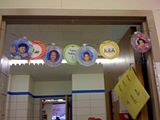
I separated these by classroom and had my students give them to their homeroom teachers as a holiday gift.
What do you think??? Sorry the pictures are so large. I am having trouble with Photobucket. I'm working on it.
You'll need string, student pictures, a round template (I used a paper ornament) and colored / scrapbook paper.
First, you have the students color & cut your circles/ornaments.

Second, you'll need to cut you your students pictures in a circle. Make sure your students pictures are smaller than your ornaments.

Next, get some cute paper. You'll want two different colors/ kinds. You can Write messages or just add some cute clipart. Then cut those into circles also. Glue your students pictures to the students ornaments. Then glue your messages & clipart to your colored paper. Punch 2 holes at the top of each circle/ ornaments. Sorry I don't have a picture of this.
Last, string your ornaments/ circles on your string and tie a knot at each end.
Here are 2 examples.


I separated these by classroom and had my students give them to their homeroom teachers as a holiday gift.
What do you think??? Sorry the pictures are so large. I am having trouble with Photobucket. I'm working on it.
Friday, December 10, 2010
First Graders
While I spent this week with my Kindergarteners doing all things Gingerbread men, I took a completly different approch to my First graders classes. I read a variety of books this week.
Monday: Snowmen at Christmas
Tuesday: Merry Christmas Splat
Wednesday: Fancy Nancy's Slendiforous Christmas
Thursday: The night before, the night before Christmas
Each day we talked about how the true meaning and joy of the holidays is spending time with those we love and not about the gifts. Then today, Friday I had the students color and cutout a wreath. Next, we completed this sentence "The holidays are special to me because..." Put it all on some festive red paper, and as Fancy Nancy says, voilá. Here are just a few samples.


I guess we didn't really understand the real meaning of the holidays.
Monday: Snowmen at Christmas
Tuesday: Merry Christmas Splat
Wednesday: Fancy Nancy's Slendiforous Christmas
Thursday: The night before, the night before Christmas
Each day we talked about how the true meaning and joy of the holidays is spending time with those we love and not about the gifts. Then today, Friday I had the students color and cutout a wreath. Next, we completed this sentence "The holidays are special to me because..." Put it all on some festive red paper, and as Fancy Nancy says, voilá. Here are just a few samples.


I guess we didn't really understand the real meaning of the holidays.
More Gingerbread Men!!!
Alright so I know that there are million and one Gingerbread men activities out there. Actually, this one is inspired by the many that I've read from other blog.
We started the week by reading several Gingerbread Men, Boy, Baby... stories and then we colored in our own Gingerbread Man. I got the templet from a wonderful blog, www.first-grade-teachers.blogspot.com. You can also get it from her site, www.lovetoteach.com.
For Gingerbread Man templet
Then cut him out and pasted our sentence "I caught the Gingerbread Man!" underneath.
To download the Gingerbread Man sentence please click here.
Here is what they look like.


We did lots of other Gingerbread men activities, but I didn't get pictures of them.
We started the week by reading several Gingerbread Men, Boy, Baby... stories and then we colored in our own Gingerbread Man. I got the templet from a wonderful blog, www.first-grade-teachers.blogspot.com. You can also get it from her site, www.lovetoteach.com.
For Gingerbread Man templet
Then cut him out and pasted our sentence "I caught the Gingerbread Man!" underneath.
To download the Gingerbread Man sentence please click here.
Here is what they look like.


We did lots of other Gingerbread men activities, but I didn't get pictures of them.
Friday, December 3, 2010
A quick teacher visual planner
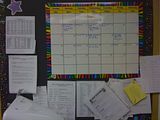
Here is a visual monthly planner that helps me keep track of all my meeting and special events. This summer a purchaed a new calendar chart but it was too big for me. So I bought a smaller one and turned the large one into a kind of desk caendar. I laminated the chart and use overhead markers to write on it.
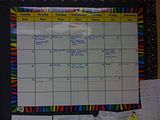
I color code, dates (numbers) in black, meetings in blue, special events in green and plan days & days off in red. I put it up on a bulletin board I use to keep track of my important papers.
I've seen other teachers who use charts like this to display homework for their students. Sorry I don't have a visual. They use the Sunday boxes to post the subject. Then wright in assignments in the days of the week.

I color code, dates (numbers) in black, meetings in blue, special events in green and plan days & days off in red. I put it up on a bulletin board I use to keep track of my important papers.

I've seen other teachers who use charts like this to display homework for their students. Sorry I don't have a visual. They use the Sunday boxes to post the subject. Then wright in assignments in the days of the week.


